In this post we'll cover the basics of the
Nokta Makro Gold Finder 2000 control display and its assembly.
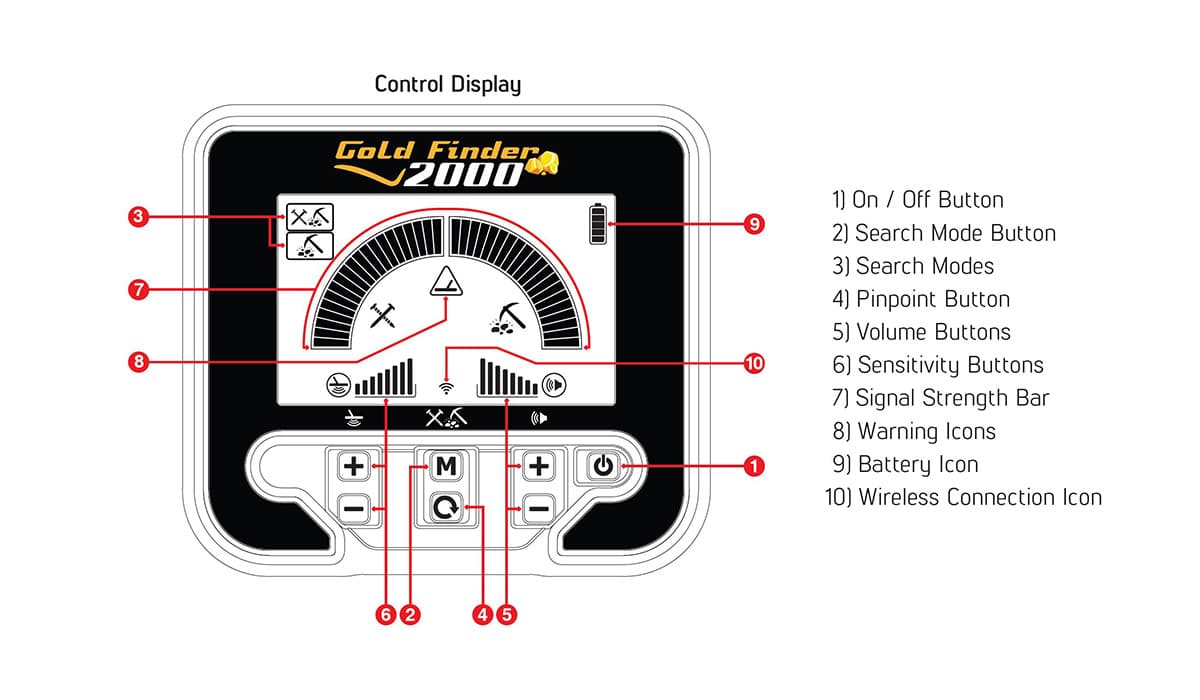
Turning On/Off the Device (1)
To turn on the device, press and hold the On/Off button until the bar starts filling up. To turn off the device, press and hold the button until the display light turns off.
Search Modes (2) (3)
There are 2 search modes: All Metal and Discrimination. Press the M button to select the mode.
All Metal Mode
In this mode, the device does not provide audio tone discrimination and gives the same audio tone for all types of targets.
Discrimination Mode
In this mode, the device does NOT provide any audio tone for ferrous metals and it provides a high tone for non-ferrous metals. In both search modes (7):

When the device detects a ferrous metal, the left side of the bar fills up in proportion to the strength of the target signal.

When the device detects a non-ferrous metal, the right side of the bar fills up in proportion to the strength of the target signal.
Sensitivity (6)
This is the depth setting of the device. It is also used to eliminate the ambient electromagnetic signals from the surrounding environment and noise signals transmitted from ground. Sensitivity setting consists of 8 levels and is pre-defined for each mode. Each mode starts with its default sensitivity setting and it can be manually modified when necessary.
Volume (5)
Press the + or - button to adjust the volume.
Pinpoint (4)
Pinpoint is to find the center or the exact location of a detected target. To perform pinpoint :
- After a target is detected, move the search coil aside where there is no target response and push the Pinpoint button.
- Keep the button pressed down and bring the search coil closer to the target slowly and parallel to the ground.
- Signal sound becomes stronger and changes in pitch while getting closer to the target center. In addition, the bar on screen will rise or fall based on signal strength.
- Mark the position which provides the loudest sound using a tool or your foot.
- Repeat the above procedure by changing your direction 90°.
Actions to be performed from a couple of different directions will narrow the target area and provide you with the most exact details of the target location. Note : If the ground is highly mineralized causing the device to overload, decrease the Sensitivity until the overload warning icon disappears from the screen.
Frequency Shift
It is used to eliminate the electromagnetic interference that the device receives from another detector which operates in the same frequency range nearby or from the surroundings. If too much noise is received when the search coil is lifted in the air, this may be caused by the local electromagnetic signals or excessive sensitivity settings. To shift the frequency, press and hold the M button for 3 seconds while the device is on. The frame around the search modes icon will start blinking. Change the frequency using the sensitivity +/- buttons. Note: If no button is pressed for 5 seconds, the screen will time out and the device will revert back to the main screen. Frequency shift will be reflected on the left side of the bar. The left side of the bar will start filling up / falling each time you press the sensitivity +/- buttons. Frequency shift consists of 10 steps and 5 is the central frequency. IMPORTANT! At each powerup, the frequency shift setting will start at the central frequency of 5.
Illumination LEDs
It is the flashlight used for lighting the area you are scanning while detecting at night or in dark locations. To activate the LEDs, while the detector is on, press the pinpoint and volume minus (-) buttons at the same time. Repeat the same to turn them off. LEDs do not operate when the device is off. It is recommended to turn them on only when necessary since they consume extra battery power.
Warning Icons
 Low Battery Warning (9)
Battery icon on the display shows the battery life status. When the charge decreases, the bars inside the battery icon decrease, too. When the battery is depleted, the battery icon will start flashing.
Check Coil (8)
It indicates an interruption in the search coil transmitter signal. The search coil connector may be unattached, loose or disconnected or the search coil may have a defect. If the issue continues when you change the search coil, there may be an issue in the coil control circuit.
Overload (8)
Shallow and/or large targets may cause an overload and the device starts to generate a continuous sound which resembles a siren. Overload icon is shown on the display simultaneously. In such a case, lift the search coil up until the icon disappears.
Wireless Connection (10)
Gold Finder 2000 has a built-in wireless module which allows for wireless speaker and wireless headphones connection. The wireless speaker is supplied with the device and the pairing instructions are provided below. You can find the pairing instructions for the wireless headphones in the Nokta Makro 2.4GHz Wireless Headphones sold separately. Turn on the wireless speaker by pressing and holding down the power button and do not let go of the button until the beep indicating the battery status is heard. The green LED on the speaker will start flashing fast. The speaker is ready to be paired with the device. Turn on the device while pressing the sensitivity plus (+) button. Do not let go of the sensitivity plus (+) button until the device is turned on and the wireless icon appears at the center bottom of the screen. Once the wireless icon is displayed, the sound will be heard both from the device and the speaker. If the pairing is not successful, repeat the above steps.
Changing the Wireless Connection Channel
To change the channel, press and hold the M button for 3 seconds while the device is on. The frame around the search modes icon will start blinking. Change the frequency using the volume +/- buttons. The channel number will be reflected on the right side of the bar. The right side of the bar will start filling up / falling each time you press the sensitivity +/- buttons. There are a total of 20 channels. When the bar is completely empty, it means that the wireless connection is off.
Factory Defaults
Press and hold the M button immediately after turning on the device. When the display light turns on, release the M button. The bar will rise and fall, the battery icon will fill up and the device will revert back to factory defaults.


0 comments