Quest X10 Target Identification and Advanced Programming
Target Identification with the Quest X10
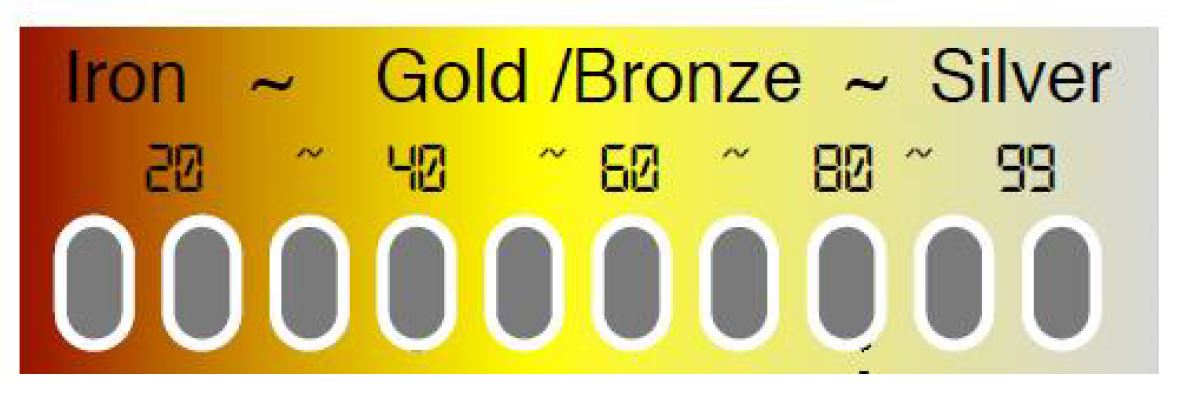
The X10 provides information on a target's probable identification to help you determine if it is something you want to recover. When a target is detected, the X10's circuitry analyzes the signal and assigns a specific number ranging from 1 to 99 based on the target's conductivity. Objects made of iron tend to read at the lower end of that scale while targets made of copper and silver fall at the upper end of the scale. The figure below shows where different targets fall on the 1-99 scale. As the coil passes over a target you will receive an audio response which can also help identify targets based on the Audio option you have selected. This will be covered in the Advanced Programming section of this manual. The Target ID# will appear in the center of the LCD display screen and the corresponding bar at the top of the screen will tum black.
NOTE: In areas containing trash and good targets, it is not always possible to reject all trash and only dig good targets. Target ID accuracy will depend on the ground conditions, the concentration of targets, external interference, target size & orientation as well as the depth of the target. Testing known targets before you head out will help you understand how specific targets will register in terms of their audio response and Target ID#. There will be a slight variation in Target ID #'s as you sweep back-&-forth across a target which is normal; however, if the number fluctuates +/-20 or more, the detected target is typically trash. As you gain experience on actual in-ground targets you will find that you are able to identify good targets with a high degree of accuracy.
Advanced Programming of the Quest X10
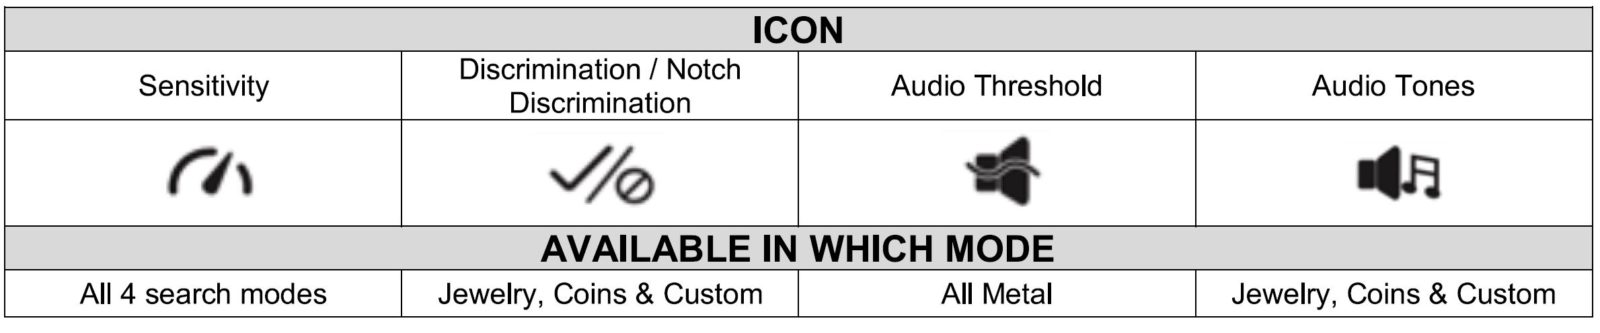
Sensitivity
The Sensitivity control on any metal detector is often misused resulting in reduced performance and increased frustration. Simply put, the Sensitivity control adjusts how strong a signal is required for the detector to produce an audio response. If it is set too high, you will receive false signals from electrical interference, concentrations of trash, changing ground conditions, and even bumping the coil against a rock or stick. On the other hand, if you set it too low, the detector will be extremely quiet but you will not be able to detect the smaller or deeper targets. The adjustable-range on the X10 is from 1 to 99. For general treasure hunting the optimal setting is as high as you can set it without getting false signals as you sweep the coil across the ground. The factory preset values are good starting points and keeping it in the range of 60 to 90 will provide the most stable operation under most ground conditions.
To adjust the Sensitivity level, press the MENU touchpad and highlight the first icon. Use the UP or DOWN arrow touchpads to adjust the Sensitivity to the desired level. You will see the actual value displayed in the center of the screen and the 4-segment bar on the left side of the screen reflect the range you are adjusting in.
Operating Tips
- If the ground is highly mineralized, reduce the Sensitivity level and re-Ground Balance the X10
- If you are searching for shallow targets such as a recently lost piece of jewelry or property marker, drop the Sensitivity to 50 or less.
- If you are searching saltwater beaches, a lower Sensitivity level will be needed once you get into the wet sand in order for the unit to remain stable
- Don't assume higher sensitivity settings are always preferable. If the X10 is chattering, it makes it difficult to determine if you went over a deep target or the sensitivity was simply set too high. You want the detector to be stable for optimal performance.
Discrimination/Notch Discrimination
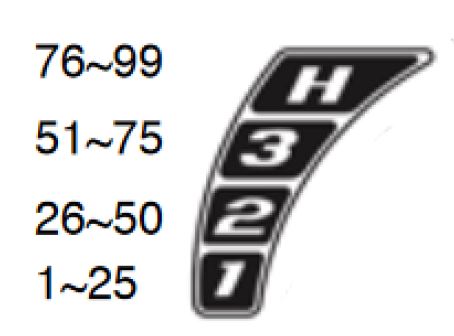
A metal detector is designed to do one thing and this is to locate buried metal. In some cases, you may want to search for all metal objects in the ground but for most treasure hunters, having the ability to select which targets to accept and which to reject is a necessity. The X10 allows this to be done through its Discrimination and Notch Discrimination circuits. At the top of the screen are ten (10) segments. These represent groups of Target ID #'s; i.e., 1-10, 11-20, etc. that are either accepted (black) or rejected (clear).
NOTE: The Discrimination function is NOT available in the ALL METAL (AM) mode as it will accept all of the segments and is intended for applications such as electronic prospecting and archeological surveys where all metal targets can be desirable. The other two factory preset modes - COINS and JEWELRY - have some of the segments already eliminated and these will serve as the preferred modes for most searches. The X10 has a USER mode which allows you to customize settings based on the type of targets you are searching for or want to reject and save them to be used later. The figure below shows the segments available and with all being black, everything will be accepted.

To reject a specific segment that corresponds to a bothersome trash target in your search area, press the MENU touchpad until the DISCRIMINATION icon is shown and then use the UP or DOWN touchpad to move the flashing segment to the one you want to reject or accept. Press the MENU touchpad again to make the segment disappear (rejected) or turn black (accepted). If additional changes are desired, repeat this process to create a custom discrimination pattern. When you are done, press the PINPOINT touchpad to return to the search screen. Any changes made to the segments at the top of the screen will remain even when the power is turned off. To restore segments that may have been rejected or accepted, use the process described above.
Audio Threshold
When using the All-Metal mode you will hear a constant audio signal in the background. This is intended to help you hear the response from very small targets such as that produced by a piece of gold or other metallic specimens. Depending on the type of headphones you are using, you may need to adjust the level of the threshold sound you hear. You want to adjust it so that you can barely hear it yet still able to hear slight changes indicating a very small or deep target has been detected. Select the ALL-METAL mode using the UP / DOWN touchpads and then press the MENU to activate the AUDIO THRESHOLD icon. Adjust the threshold to a comfortable level using the UP / DOWN touchpads. Press the Pinpoint touchpad to start hunting.
Audio Tones
The X10 offers six (6) different audio options to choose from. They are:
- C1: In this option, all targets -from iron to silver-will produce the same tone. It offers little target information
- C2: This option produces 2 tones ... iron will be a low tone and all other targets will produce a mid-tone
- C3: This option produces 3 tones ... iron is a low tone, mid-range targets a mid-tone, and copper/ silver a high tone
- C4: This option produces 4 tones ... iron being the low tone and the remaining range from 20 to 99 is divided up into 3 zones with each producing a noticeably higher tone
- C5: This option produces 4 tones ... iron being the low tone and the remaining range from 20 to 99 is divided up into 4 zones with each producing a noticeably higher tone
- C6: This option produces a single tone for all accepted targets which varies in pitch based on the strength of the signal from the target.
For most forms of treasure hunting, the C3, C4, or C5 options will be the preferred choices. These allow you to identify the type of target you have detected based on the audio response and then determine if it is worth recovering based on the Target ID# that appears on the screen. The C2 and C6 options are preferred when relic hunting or searching for shallow targets.


0 comments